Old / Original Website
My Skills
Project Management
Creating tailor-made solutions for my business customers has fulfilled me for years. What my clients want is of crucial importance to me and I always strive to exceed their expectations.Mobile Develpoment
Mobile app development is my core competency, which I have been pursuing for more than over 10 years now. Android and iOS (Native or with Cordova and NodeJS or Reactive).Web development
Responsive Web-Sites, -Service and -Sockets with state of the art tech. Material design using CMS and Frameworks of your choice and that fits best to your needs. OAuth and the latest security measures.3D / Game Development
Since about 5 years now I'm investing part of my freetime and also some business time into creating 3D Projects and Game development. Read more about that by scrolling further down.About Me
I began my IT experience in 1991 when I got my first PCs and started learning programming autodidactically. In 1999, I began my studies to become a certified software engineer and successfully completed them in 2003.
In my recent positions, I have worked in diverse fields and industries for employers in international environments and acquired a comprehensive set of skills and techniques.
Over the last few years I have worked intensively in mobile / web app development and 3D design and have also trained further. For my professional future, I would like to have a responsible and meaningful engagement in one of these areas.
I enjoy working independently and preferably working from home-office. Of course, there is always a need for regular communication with the company and customers, but I know myself best and know how to achieve optimal performance. That's the way it is.
My recent work
-

LLDB Python-GUI
OSX Development -

legaleskokain.kimhauser.ch
Mobile / Web Design -

kikurs.kimhauser.ch
Mobile / Web Design -

Quanten Computing
Quanten Computing / KI -

Original Website
Web Design -

kundainfo.ch
Mobile / Web Design -

freioccasionen.ch
Mobile / Web Design -

PlayerStartPlugin
3D Projects -

Android App - Waypoint
Mobile Apps -

Night Shift Chessclub
Web Design -

COVID Feedback
Web Design -

Visualize Input Event Plugin
3D Projects -

Android App - S4 WeatherStation
Mobile Apps -

TeleportSysBase
3D Projects -

Fahrschule MF
Web Design -

Kindle Paperwhite - HelloWorld
Articles -

MH Umzuege
Web Design -

macOS - Tips and Tricks
Articles -
Suake3D
3D Projects -

iVaccination
3D Projects
Want to see more?
Check out my portfolio and CV.
Projects as a self-employed person

Hi visitors
I appreciate your interest in my person, my work and that you are visiting my page. Please feel free to Google me as well.
Recent Private Projects
Web Design
-
Information-tool for the Kontakt & Anlaufstelle Zürich
-
Business platform for Frei Occasionen Zürich
-
Feedback platform to report to the Swiss government on its COVID-19 management.
-
Scoreboard and analysis tool for (our) chessclub.
-
CSS lib for creating a floating Menu Button on your responsive Websites
-
An overview of my public digitized paintings. Painting is a balancing hobby of mine.
Games / 3D
-
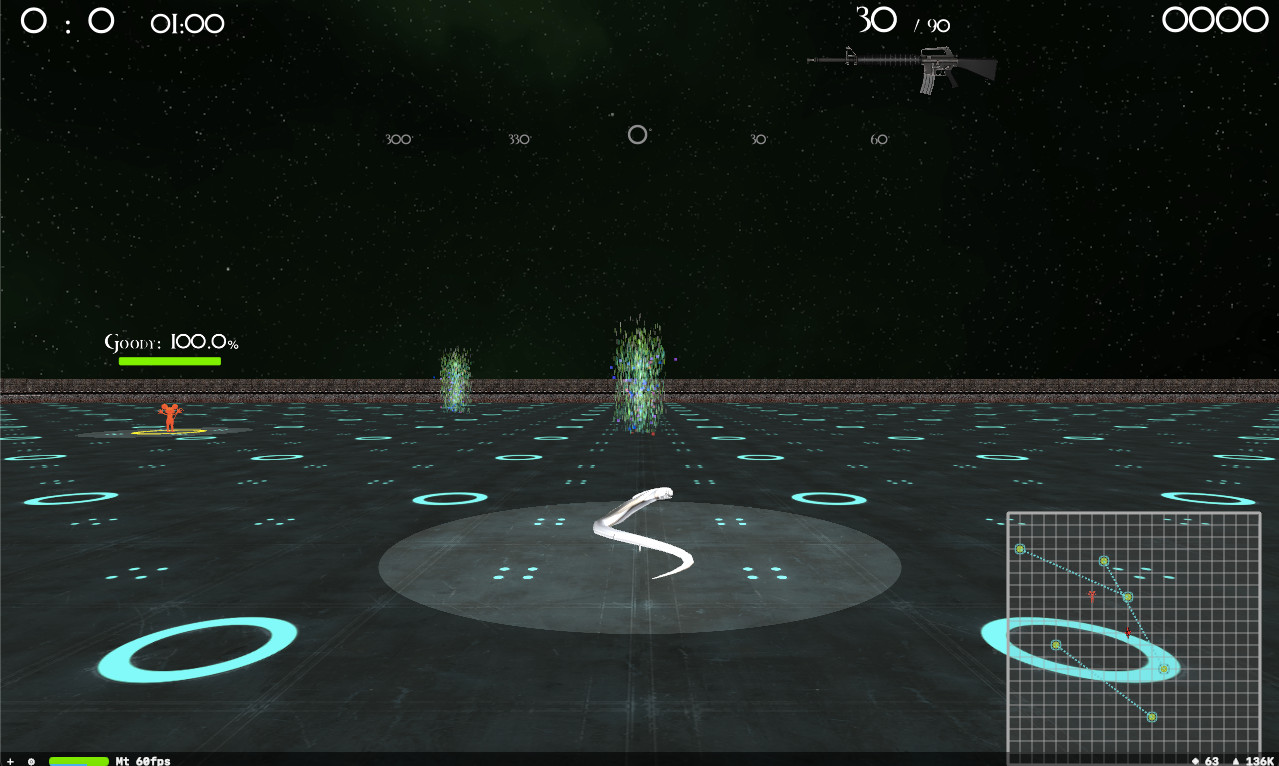
A 3D variant of the 2D game Snake with Swift and SceneKit
-
A 2D shooter game similar to Moorhuhn made with Swift and SceneKit. You have to vaccinate zombies to save the world.
-
Videos of Rendered 3D Wormholes made with Blender (include *.blend)
-
Overview of my 3D Models created with Blender
Android Apps
-
A worktime reporting tool with GPS functionallities. You can use the GPS data and also automate recurring jobs.
-
Android Weatherstation App for the Samsung Galaxy S4 and Note 4
Unreal Engine Projects
-
A Unreal Engine Plugin for easily changing the current PlayerStart
-
Another Unreal Engine Plugin for Visualizing all Input Events in the UE Editor
-
An upcomming Plugin for UE5 to support the creation of teleporters for your own projects.
Online Videos
-
Overview of my public Youtube Videos (various topics)
Some Reviews
Business partners


Contact Me
Where to meet
Kim David HauserAnywhere in Zurich or online
CH-8004 Zürich


